Tuesday, February 12, 2013

A Winter Walk

Winter Colors

The forecast called for snow tonight, but I say rain.  The morning fog dragged on until evening keeping my little paradise well blanketed.  I had to get out of the house today to clear my head, too many projects, and too many ideas swirling around, and no clear starting place for my "to do" list.  Really, it's the perfect conditions for a walk down the hill, and I could no more walk down the hill without my camera than I could walk down the hill without my legs.  

Once upon a time, I really despised winter, cold, and grey, and dreary.  Perhaps I am look more carefully now.  Winter is not overtly beautiful like the spring, but there is a certain thrill to its beauty, like the thrill of finding hidden treasure.  Perhaps it is the austerity of winter that allows the subtle things to be so joyous.  There are subtle splashes of color, the sounds of church bells and chickens, the heavenly smell of  witch hazel, and a stillness that is so calming.    

In the Winter Garden

Witch Hazel...the most incredible scent

Still Reflection

Lichen and Buds

Boats Waiting out the Winter


Radial Symmetry 

A Close up View

The Long View


Tuesday, February 5, 2013

Horsing Around


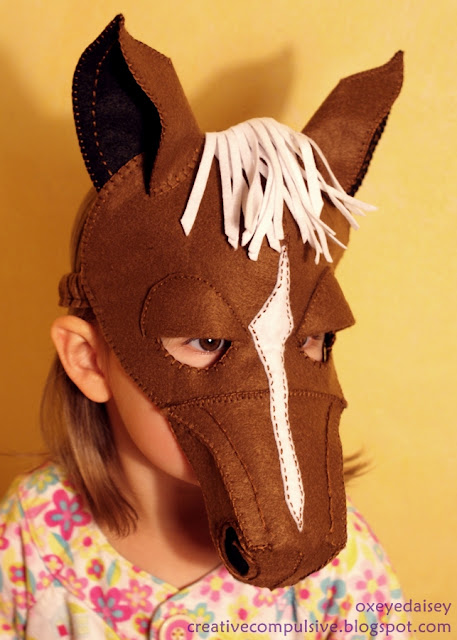
Horse Mask

At the request of one of my very loyal customers, I have been working on a horse mask for the better part of a month now.  I am so happy to announce that the mask is finally finished and in the shop!

There is quite a process involved in getting a mask out of my head and into the shop.  First I must research the animal and consider what features are essential for making a mask work.  Then I do a paper mock-up...this can take hours, sometimes days, and usually results in a large pile of "nope not quite right" papers piled up around me.  Next comes the first felt mask.  As I translate the pattern from paper to felt I make more changes.  When the mask is to my liking I "draw" the pattern digitally.  Depending on the complexity of the pattern I make a few more and write the instructions.  Once the instructions are written I illustrate the instructions and put all the finishing details on the paper pattern.  Pictures must be taken, models must be bribed, and editing must be done before FINALLY the pattern is ready for the shop!


I made the horse mask first in brown....

Horse Mask

Horse Mask

Then I got sidetracked and made a Dala horse mask...this pattern isn't finished yet, but hopefully by the later part of next week....

Dala Horse Mask

Dala Horse

Next I made a unicorn.  The horn stumped me for awhile, but when I finally decided to just give it a try, it turned out not to be so difficult after all.  The unicorn mask pattern will be in the shop, hopefully, by the early part of next week.

Unicorn Mask

Unicorn Mask

The black horse was the last mask I made, and I made it as I was writing the instructions....I really like the black horse.

Horse Mask

And that is all the horsing around for now...

Sunday, February 3, 2013

Circle Skirt

circle skirt pattern
Add caption

I've spent the last week writing directions for a couple of patterns, this sweet little circle skirt and a horse mask (coming soon).  When it comes to the preliminary steps of a new design I am really on the ball, I love the initial patterning, I love the sewing, and I even enjoy the alterations, but when it comes time for the finishing work, the pattern grading, the writing the directions, and labeling the pattern...well sometimes I wish it was someone else's job.  So, I can assure you that I am very excited that this pattern is finished and in the shop!  

heart pocket

My daughter lives in leggings and skirts, she generally refuses to wear pants.  She LOVES new skirts.  This cute little circle skirt turned out to be a breeze to make!  It has a "lettuce leafed" hem and two heart patch pockets.  I am giving her the skirt for Valentines Day, though it won't be a surprise, but she doesn't seem to mind.  You can find the pattern in My Shop!  

circle skirt pattern


Tuesday, January 8, 2013

Fit for a Fairy....the Petal Coat and Hat


Last winter I drew a sketch of what I began calling the Petal Coat.  I loved the little sketch, but ended up making a different coat last year instead.  I finally got around to making the Petal Coat, and I am quite pleased with the results, as is my model!  I think it is the perfect marriage of classic and whimsical.  The coat also goes very nicely with the Petal Hat, a pattern I designed a few years ago and just recently graded to fit the current size of my happy little model.  


The coat comes down to about mid-thigh.  It has sleeves that roll up, so hopefully we will get more than one winter's wear out of it!  


I made some decorative leaf stitching on the hood.  Though the stitching is subtle, the impression of the leaf is well made.  


The coat has cozy pockets to keep small hands toasty. 


I would like to say that the pattern will be in the Etsy shop soon, but I haven't even begun to grade the pattern yet.  What I really need are some elves.  Elves that are good at grading patterns and sewing samples in different sizes...and writing directions.  I think 3 or 4 elves would be plenty. 


Friday, December 21, 2012

Merry Winter Solstice!


I love the Winter Solstice!  It is my equivalent to the New Year.  The Northern Hemisphere has reached it's furthest tilt away from the sun.  From this point, until the Summer Solstice, the days will increasingly become longer, and as still as the world seems at this very moment, life will soon begin to stir, grow, and bustle.  

The Solstice is a time to pause and find peace in all the beauty of the winter stillness, the ice crystals, the morning fogs, and the small splashes of color that remain. And after pausing in the wintry peace....time to gather indoors, snuggle with the loved ones, warm the house with an oven full of goodies, love and be loved. 

Wishing you all a very Happy Holiday season, and hoping you find peace, joy, and love in all the holidays you celebrate!


Saturday, December 15, 2012

Super Duper DYI Holiday Gift Ideas....Idea #6

Potato Print Snowmen


These little snow people are so much fun to make!  The Snow Family shown above was printed on black velveteen by my daughter.  These fun snow creatures could be printed on napkins, towels, tee-shirts, pillows, cards, wrapping paper...or any number of things.  

Here is what you need:

    a few different sizes of potatoes
    fabric paint, or acrylic paint and fabric medium
    toothpicks
    something to print on
    beads, buttons, bells, or other embellishments

Here is how these snow people were made....


Select a few different sizes of potatoes.  I used some potatoes that had sprouted and were a little on the shriveled side...so I didn't feel like I was wasting potatoes. Then slice the potatoes in half.  


Pick a paint to use...if you are printing on fabric and the finished piece will be washed it is important to use either a fabric paint, or acrylic paint with a fabric/textile medium mixed in. I used a white acrylic paint and a little glitter paint, with fabric medium mixed in...it's what I had on hand.  

Pour a generous amount of paint onto a flat surface, I used a plastic plate.  Stick toothpicks into the potatoes, as shown.  The tooth picks are very handy when lifting the potato halves out of the paint and off of your print.  

Place the potato cut side down in the paint.  Thoroughly coat the potato in paint. I recommend doing a test run on a scrap piece of fabric, to get a feel for how much paint you need on the potato.  
  

Place the potato, paint side down on your fabric.  I recommend starting with the base of the snow person and working up.  You can use different potato sizes to create the base, body, and head of the snow person.  Make sure to apply ample pressure to the potato before lifting the potato.  


After your snow people are complete, sit and patiently watch the paint dry.


After the paint is completely dry...we gave it a couple of days...add any embellishments you wish.  We used black beads for eyes and mouths, and wooden beads for noses.  Buttons were added down the front of the snow people.  

Here is how I added the hats and scarves....


Old, holey shirts and sweaters can be given new lives as hats and scarves for the snow people.  For the scarf cut long strips of knit fabric.  I used my once favorite striped knit shirt.  Sew the strips of fabric to the snow person where the pins are in the picture.  Once the strips are sewn on, tie the "scarf" around the neck of the snow person.  After the scarf was tied, I tacked down the scarf so it would lay correctly. 


Cut a piece of fabric into a rectangle that is the correct width for the snow person's head, and the desired height of the hat.  For the hats on these snow people I used a knit shirt and a sweater.  I utilized the hems on the shirts and sweaters I cut up for the bottom hem of the hat.  


Pin the rectangle into the shape you would like the finished hat to be.  


Using a zig-zag stitch sew the hat to your snow person.  After the hat was sewn on I ran a running stitch across the top of the hat and then gathered up the top of the hat. 


I tacked down the top of the hat and a button was added to finish off the hat!
  

This beautiful snow family will soon be a pillow on our couch...


For other DYI Holiday Gift Ideas, check out:

Super Duper DYI Holiday Gift Idea #7Super Duper DYI Holiday Gift Idea #8
Super Duper DYI Holiday Gift Idea #9
Super Duper DYI Holiday Gift Idea #10

Friday, December 14, 2012

Super Duper DYI Holiday Gift Ideas...Idea #7


Painted Terracotta Pots....


My children and I love to paint flower pots!   They make lovely gifts.  Some times we put blooming flowers inside the pots, some times we plant spring bulbs or seeds, and some of the pots I use as storage containers. In the pots pictured above we will place poinsettias and give them as gifts to the children's teachers.  

Here is what you need:

         Terracotta Pots
         Acrylic Paint
         Paint Brush

     other things that are helpful:

         Two Cans
         Scrap Paper
         Q-tips

     fun things to add:

        Ribbons 
        Other Embellishments


Begin with clean terracotta pots.  Consider covering the area where you will be working with newspapers or other scrap paper...this can get a little messy.  


Paint a base layer on the bottom portion of the pot.  It's always nice to have a friend to help.  


Once the base layer has been painted let the paint dry.  


After the base layer is dry you can begin painting your pot.  It is helpful to place two cans on either side of the pot to free up your hands for painting.  


Brushes work great for large areas, but Q-tips work better for adding smaller details....especially for small hands.  


I like to paint a solid color around the top of the pot, it give a nice, clean, finished look.  Paint the inside of the upper portion of the pot.  There is no need to paint the entire inside of the pot.  However, painting the top portion of the inside of the point looks lovely once the plant or dirt have been placed in the pot.   

Here are some pictures so pots painted in years past...


I painted these snowmen.  Inside I placed spring bulbs!  


The children painted these last year for their teachers.  


I love hand prints!  This is one my son painted many years ago.  It sits high on a shelf and contains dangerous items....like Sharpies!   

For other DYI Holiday Gift Ideas, check out:


Super Duper DYI Holiday Gift Idea #8
Super Duper DYI Holiday Gift Idea #9
Super Duper DYI Holiday Gift Idea #10