Wednesday, December 11, 2013

The Fairies DO Visit!


One day my daughter arrived home from preschool REALLY excited that fairies had visited her friend. I learned that, apparently, if you leave beautiful pictures for the fairies they will leave you a present.  Her friend received a book from the fairies.  This took some quick thinking on my part, but I explained that her friend lived in the city and city fairies could bring books, but we live in the country, and country fairies make their gifts. Good enough, she set to drawing....


Over the years the fairies have visited several times.  They have brought decorated rocks and shells, leaf hearts, hazelnut fairy heads, and even a magic wand.  Gifts are always made from natural materials found around the yard and woods, and sprinkled with "fairy dust"...which makes them extra magical.  The fairies do not give gifts for every picture. Fairies do not leave gifts when it is raining or snowing, they can't fly in the rain and snow.  They are also unlikely to bring gifts during busy times, for various reasons, like helping animals hibernate, changing the colors of the leaves, or painting butterfly wings. There is  much excitement when the fairies DO visit.

Sunday, December 8, 2013

Making little things...

The clothesline we gave to the neighbor...I thought the goat was hilarious.  
Nativity scenes, or Presepi in Italian, are very popular here in Italia.  Before our arrival we did not know the joys of the presepio.  Here you can buy very elaborate pieces for your presepio, or the supplies to make your own.  We started simple several years ago with a barn, some animals, and all the essential figurines. A few years ago we found a beautiful ceramic river, and a haystack with a bowler hat in honor of Rene Magritte, while in Barcelona.  Last year we went big and added a waterfall.  I've wanted make some pieces to add to our scene for a while now, never found the time, until today.
Friday I bought supplies... some super green lichen, large pieces of bark from a cork tree, and a small amount of cork board.  This morning the kids and I gathered some sticks in the woods behind our house. After the sticks were gathered, I fired up the hot glue gun and we went right to work!  We made some trees, a fence and a clothesline. We had so much fun, we even made our neighbor a clothes line for her presepio. Now, I think we might need a model train track...making little things is fun stuff!

Our clothesline....the children would not let me add a goat...party poopers. 

Look at that great fence!  My daughter wove the little pieces in between the sticks. 
A view of the trees....

Another view of the trees.  

Monday, December 2, 2013

An Interview with Fellow Creative Compulsive and Mask Maker, Donna Prentice


elephant mask
Ebony Shae Designs Elephant Mask PDF Pattern
Donna Prentice is a mask maker in Glenrowan, Australia. She has been making masks for the last 10 years, and since 2011 has been selling mask patterns in her Etsy shop, Ebony Shae Designs. In her shop you will find a fabulous collection of all kinds of animal masks...native Australian animals, Africa animals, farm animals, and much more!  I asked Donna to share a bit about her Creative Compulsive tendencies and her mask making processes, she has graciously agreed...

panda mask
Ebony Shae Designs Panda Mask PDF Pattern 
How did you get started mask making? What was your very first mask?

butterfly mask
Ebony Shae Designs Ulysses Butterfly
Mask PDF Pattern
I started making leather masks after falling in love with Ryl Mandus' work on the computer. (My love affair with masks began as a 16 year old when I went to see the Phantom of the Opera for the first, second and third times). I don't even remember how or why I was looking at masks on the internet. But being a creative compulsive I thought - I want to have a go at that. I initially used some suede I had, and used the same process I had learned many years previously for stiffening artificial flowers. That first mask was in brown, gold and bronze and was half covered in autumn leaves. 

After some playing, I went to the local leather worker and grilled him for an hour. He ordered me my first hide and I used what he had taught me to make masks. 

Unfortunately with the addition of our first daughter I found I could no longer spend the hours it took to cure and work the leather, let alone paint it! 

Once she finally got to the age where dressing up began to become part of our play, I started sewing simple masks using some of the leather working skills and some dress making.
Friends started asking for masks and I just couldn't keep up with the demand. So the idea of helping them to make their own masks was born.


blue macaw
Ebony Shae Designs Blue Macaw Mask PDF Pattern 
What fuels your mask making compulsion? What ignites the inspiration?

Unfortunately anything and everything can spark the 'oooh, I could make a ______ mask' thought process. I have a list that if I made 2 masks a month, would currently take me 4 years to work through! Animal and nature documentaries are particularly dangerous for the compulsion. Reading stories and playing with the kids also result in either them or I saying the above statement over and over....!

reindeer mask
Ebony Shae Designs Rudolf the Reindeer Mask PDF Pattern
Tell us about your process, how does a mask go from idea to pattern? 
bat mask
Ebony Shae Designs Bat Mask PDF Pattern


When I decide to make a mask, I usually google pictures of the real animal and try to get pics from every angle. I take those pictures and draw what I would like the finished mask to look like. If I can't get that to a place where I am happy with it, I don't start making the mask because I know that it will look wrong.

I then take the standard pupillary distance for kids and adults and make sure that my eye holes will work for both.

I then take the drawing and create pattern pieces from it. I use scrap paper for this and keep making the pieces until I know they will fit nicely. 

I then cut my first pieces of felt and sew it together, taking pictures as I go and writing down what I do. If a piece doesn't work, there is a lot of scribble, re-drafting, and deleting of photos from the camera.

I then type all this up, and using Corelle Draw, trace my pieces onto the computer and add them to the pattern. Turn it all into a PDF and voila, you have a finished pattern.

Then I have to bribe the kids to wear the mask so that I can take pictures!


lion mask
Ebony Shae Designs Lion Mask PDF Pattern
When you are not making masks, what are some of your other creative endeavors? 

When I am not making masks, I am knitting, sewing, crocheting, making cards, cooking, gardening (which goes hand in hand with the cooking). 
t-rex mask
Ebony Shae Designs T-Rex Mask PDF Pattern 

Do you have any new projects in the works?

I am waiting for the school holidays (we home school, so during the term I don't get much done on masks) I have a list of another 4 or 5 dinosaurs that I want to tackle. The way I am imagining them at the moment, they will be the largest in size in the collection...

Which pattern would you recommend for a beginner?

The best beginners masks would probably be the koala, penguin, bat, panda, bear and wombat. There are more that are fairly simple to sew, but they take more cutting out (like the lion or hedgehog). I do try to make most masks easy enough for someone with just basic sewing skills.

bear mask
Ebony Shae Designs Bear Mask Pattern 
To view the rest of Donna's creations please visit her shop, Ebony Shae Designs on Etsy....and make a mask or two...I am absolutely certain you could find some willing wearers!  

Thank you so much for sharing, Donna!  I think your masks are absolutely wonderful and look forward to seeing the new additions!  

Sunday, December 1, 2013

Fold Along...24 Holiday Origami Projects!


Welcome to the Origami Advent Calendar Fold Along! 24 holiday related origami projects have been collected, one for each day from now until Christmas.  Links have been posted to all 24 projects and photos and comments will be added as we fold each project. Join us, and fold along!  Please feel free to post pictures in the comments.  


24.  Five Point Origami Star:  The 5 pointed star was very fun to fold, and excellent instructions are provided on Homemade Gifts Made Easy.  We made some out of magazine pages.  The magazine pages did not prove to be the easiest to work with, but not impossible.  We also made a couple from origami paper.  The origami paper held the folds better, making it was easier to work with.  


origami 5 pointed star

23.  Babbo Natale (that's Italian for Father Chirstmas):  In order to have red paper with a white back I simply printed large red squares on regular printer paper, it worked well. We struggled with this one a bit between steps 5-7, but my daughter figured it out!  It helps to look a step ahead and just try to make your paper look the way it does in the next step.  After we figured out the folding the little Babbo Natale was fun to personalize.  The children enjoyed adding their own touches, my daughter added a cotton beard and my son added an origami toy sack.  


origami santa

22.  Candy Cane: The candy canes are super easy to fold....perfect for even the youngest origami connoisseur!  We decided to add bows to our candy canes for a greater folding challenge.  I found the directions for the bows at Origami-Instructions.com.  This is an excellent site!  The instructions and photographs are very well done.  We made one minor change to the bow. The way the instructions are written there is white that shows on the back of the tails of the bow.  I folded them so all the white was tucked into the inside, so they will look more "finished" when hanging as ornaments. 
  
origami candy cane

21.  Song Bird:  I love bird ornaments!  I have several bird ornaments for the tree, so I thought I would sprinkle in a few bird origami projects.  The whole family folded a Song Bird this evening.  Once again, excellent instructions from Origami-Instructions.com.


origami song bird

20.  Reindeer:  The folding of the reindeer was our most challenging project to date, but the directions were good, and we are pleased with the results. My daughter decided some of the reindeer should be female and therefore, without antlers.  The paper we used was an ancient marbleized paper I made 18 very long years ago, but managed to keep, and literally move around the world.  I had to cut the paper to make squares so I made smaller squares with the leftovers...small squares turned out to be perfect for "baby" reindeer, ergo the reindeer family was born.  

origami reindeer


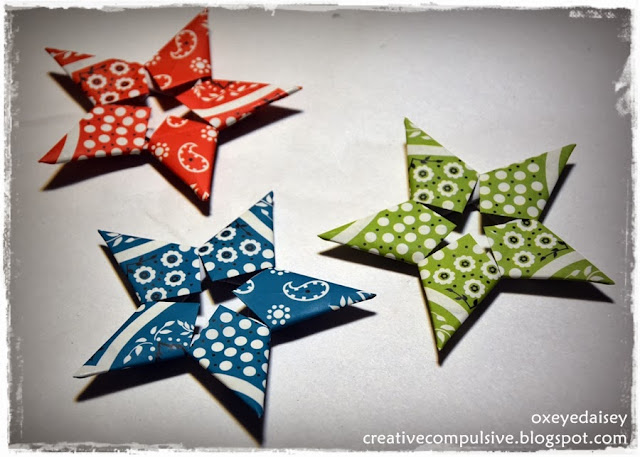
19.  Sheriff's Star:  I really love this one!  Super easy to fold and it looks beautiful.  Excellent instructions provided by Origami-Instructions.com. The star takes 2 1/2 square pieces of paper, this is modular origami.  I cut up some scrapbook paper I had around the house.  The paper had a bandanna print on it, which I thought was fitting for the Sheriff's Star.  My daughter is busy now folding more and more sheriff's stars!  


origami star

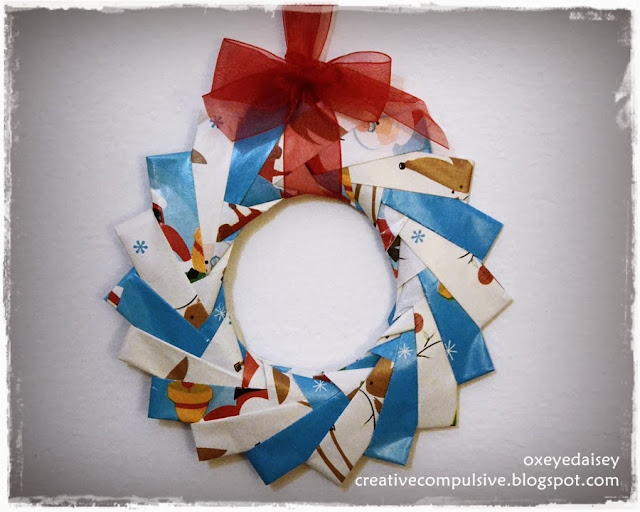
18.  WreathThis is our second modular origami project, and like the Sherriff's Star, the Wreath is very easy to fold.  You need 18 squares to make the wreath.  My 6 year old folded the pieces while I cut out the squares out of some wrapping paper. I had a little bit of trouble getting with the wreath wanting to come apart, but I think it was due to the slick nature of the wrapping paper.  I finally got it all to stay all together and the wreath is now hanging in the window!  


origami wreath

17.  Fir Tree: We had a trouble with the fir tree, when got to almost the last step and could not figure out what to do and got to frustrated to continue.  I was going to find another tree, with a video,  but have not had the opportunity yet. 

16.  Santa: As soon as I let go of my need to know precisely where to make the folds this little Santa went fairly smoothly.  At the request of my daughter, after we were finished folding we embellished Santa with some buttons, beads, and a little cotton.  My son had other ideas...
  
origami santa claus


He decided to add a bit of creative folding at the end and make Orangutan Santa instead...Orangutan Santa, very popular with the 9 year old crowd.  


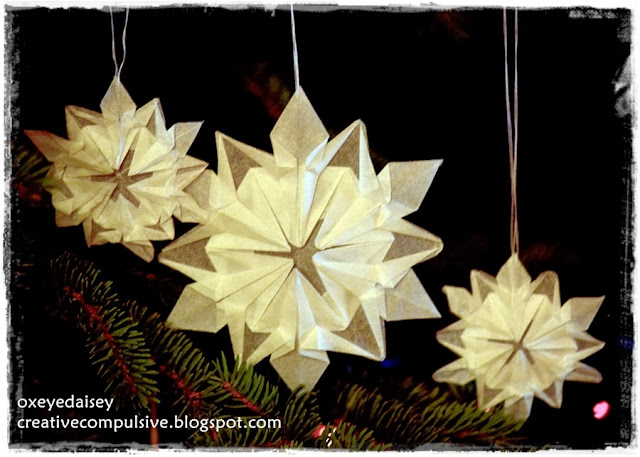
15.  Snowflake: I was very happy to find both the written instructions and a video for the snowflake!  We used parchment paper to fold the snowflake.  I think vellum would have made crisper more accurate folds.  The more accurate the snowflake, the more crystalline the snowflake looks.  Ours looked a little "melted" in places, but pretty none the less.  Folding the little ones were especially challenging.  I recommend folding with a hexagon that has sides that are at least 4 inches.  I also found making an accurate hexagon difficult with the parchment paper and ended up printing out a template and using it instead of folding and cutting a hexagon.  


origami snowflake

14.  Owl:  This owl is tiny and so very cute.  There is a great video tutorial available on Origami-kids.com.  The instructions are straight forward and the pace of the video is just right to fold along as you watch.  


origami owl

As I was looking through the Origami-kids website, I found another owl I couldn't resist folding.  It is the Larger Owl shown below.  You can find a video tutorial on Origami-kids.com.  This was a fun owl to fold, the base is different than anything we have folded so far, I enjoyed folding something different.  I added the googly eyes...they were already out and handy and looked so cute on the little owls.  


origami owl

Why fold just two owls when you can fold 3? Right? My folding buddy had already gone to bed when I folded Owl #3, but it is very straight forward and I am going to show her how to do it tomorrow.  I think she will love it.  The instructions are very well illustrated, easy to follow and can be found on Origami-fun.com.  Now I am thinking a tree covered all in owls would be really fun...


origami owl

13.  Humming Bird:  We struggled a bit with the humming bird, but finally figured it out.  The wings on the humming bird move up and down if you hold it just right.  


12.  Robin Star:  A modular star made with 8 pieces, this was exciting to fold. Excellent, illustrated instructions can be found on goorigami.com.  My daughter and I folded this one together.  


origami star

When we were finished we put it together with on of the Sheriff's Stars we folded earlier and hung it on top of the tree!


origami christmas ornaments

  
11.  Christmas Tree:  These Christmas trees turned our really quite lovely.  I found the instructions and supplemental video on myLifeboxblog.com.  These are actually pretty easy once you understand what to do.  My daughter says they even feel like a real Christmas tree.  She was very happy with the trees... 


origami christmas tree

So happy the trees ended up becoming part of the children's Playmobil Advent calendar.  


origami christmas tree


10.  Reindeer 2:  This is the second reindeer we have folded.  The first one was a little more challenging, but both my daughter and I decided we like it better.  The proportions on this one were a little odd, I made some extra folds on the leg so they weren't so huge...but fun to fold all the same.


origami reindeer

  9.  Santa 2:  This was our third Santa Claus.  An quick and fun fold.  We all choose very different papers, which I think gave each Santa a very different feel.  After all this folding, the paper supply is getting a little low!  


origami santa
Add caption


  8.  Peace Crane:  The origami classic!  I love folding cranes.  Turns out my daughter also loves folding cranes.  We made a string of them interspersed with beads.  They are hanging in front of the mirror by the door.  After our paper shortage yesterday, I bought a very large pack of scrapbook paper, so we chose the winter themed paper for our cranes.  We cut the scrapbook paper in fourths, for the perfect folding size.  I don't know where to purchase origami paper here.  In our string of cranes I included one my mom folded when she was here this Summer.  Hers is the silver one, it is made from a chocolate bar wrapper!

origami peace crane

My daughter folded more Peace Cranes to add to bags filled with homemade cookies to give to teachers.  

origami peace crane teacher gifts


  7.  Santa's Cap:  The Santa's Cap is fun easy to fold.  I found a great use for them...instead of a bow on the top of a wine bottle gift, how about a little Santa Cap. It's perfect for holiday parties!  
  
Santa's Hat origami Holiday wine bottle

  6.  Snowman:  After folding the first snowman we decided to change the proportions just a bit.  When you fold the snowman like the instructions show the hat ends up being very, very small.  At step 5, by folding all the way to the mid-line, the had ends up a bit bigger.  We added some beads for the eyes and mouth, some buttons, and a bead for the nose. 

origami snowman

  5.  Santa's Face:  I was busy finishing up some work on the computer, when I turned to look my daughter had folded 7 Santa Faces!  The Santa Face has easy to follow directions and is an easy, fun fold.  We turned 4 into ornaments, she has given one away already.....
  
origami santa claus


...and the remaining 3 we turned into cards.  I love the cards.  The backs of the Santa's Face are not finished, so putting them onto a card was a great solution.  

origami santa claus cards

  4.  Navigator Star
  3.  Star Ornament
  2.  Penguin
  1.  Santa Claus

Saturday, November 30, 2013

The Advent Calendar(s)


Friday, as we were walking home from school, I mentioned to my daughter that it might be fun to make an origami advent calendar.  That got the wheels turning!  She loved the idea and got to work as soon as we got home.  A couple of weeks ago we learned how to make an origami picture frame.  She modified the picture frame just a bit and began folding....and folding....and folding.  (Have a mentioned Creative Compulsive Disorder often starts in childhood)  

This morning she added a little glitter for good measure, then we filled the clever little pockets, and taped numbers in the center to hold the pockets closed.  She came up with the configuration and I tied them to a stick we found in the woods.  

Voila! 31 sheets of white paper, a little bit of ribbon, and one stick later, we have an advent calendar.  Want to know what's in the pockets? .... You have to wait until December 1st!

So while my daughter and I were busy with the origami advent calendar, the biggest Lego fan in the family was busy making his own advent calendar....


There are 23 little doors and other various parts that flip up and reveal  a Lego guy.  The 24th Lego guy is under Santa's beard!  The Lego street in the foreground...that's where all the Lego guys play, and best of all there are no numbers, you get to open them randomly...except of Santa's beard, that on is for Christmas Eve!  

Let the count downs begin!  

Saturday, November 16, 2013

It's November....It's Olive Picking Time!


Imagine, it is a cool, November morning, you are standing among the olive trees, on a hillside in Northern Italy.  The dew is still thick on the ground, the air smells like fall, heavy with the scent of wet earth and wet leaves.  The morning fog is just giving way to a bright blue sky.  The branches of the olive trees are laden with beautiful black and green orbs.  There is a steady flow of lyrical conversation as friends, family, the old, the young, and everyone in between have gathered together to help with this year's harvest....


Confession....I love to pick olives.  There is just something about it that is timeless and gives a sense of deep connectedness to both nature and civilization.  This was our 7th olive season in Italy.  I have had the great fortune of helping every year, but one.  This year may have been my favorite.  My Italian, though not great, is good enough for me to participate, at least a little, in conversations now, unless of course they are in dialect, then there is no hope for me. This year the children were old enough to be independent and help and/or play has needed, so this year I took to the high branches.


Olive trees are pruned so they are very easy to climb.  There is nothing that makes you feel young, like climbing a tree...even trees that are not so high.  From the tree tops, there is an amazing view of the neighboring hills and during the moments the bells are ringing...it is amazing!  Now, add to this scene the rising voices of people singing who have gathered together for a special Mass, on the 2nd of November, in the cemetery, just 200 meters just down the hill....simply awe-inspiring.


It was a very good olive year this year!  Once picked the olives get carted off to a community olive press to be made into oil.  If you are interested in the olive oil process, I had the wonderful opportunity of visiting a press two years ago and read about the experience here...Olive Oil.