Tuesday, September 9, 2014

Raccoon Mask


rocket raccoon mask
OxeyeDasiey Raccon Mask
Today is the Raccoon Mask's premier in the Etsy shop!  Yes, we did see Gaurdians of the Galaxy, and yes, we are Rocket Raccoon fans, and yes, it may have influenced the decision to make a Raccoon Mask!  Fun, fun!  Hope you enjoy the new mask!  

Fun for girls....

raccoon mask
Raccoon Mask
and boys (of all ages)!

raccoon mask
Raccoon Mask

Tuesday, September 2, 2014

Muskox Birthday


When I asked my daughter what kind of birthday party she would like, I was not expecting "MUSKOX!"  In fact my first response was something along the lines of, "REALLY?!"  Unbeknownst to me muskox are fluffy, and comfortable, AND her favorite animal!  Who knew.  After the initial shock, I must admit I was really, really excited to have a muskox party.  She knew exactly what she wanted, a muskox pinata, a Pin the Tail on the Muskox game, muskox masks for all her friends, and a muskox cake.

Party preparations started with the muskox pinata.  "So what color would you like the muskox to be?" "BLUE!  I would like a BLUE muskox!"  Obviously, what a silly question.  So early on the muskox party turned into the blue muskox party.  During the making of the pinata, we went from just any ol' blue muskox to "Rachel"...."Rachel the Big Blue Muskox".  

The only problem with naming a pinata is that it makes the thought of breaking the pinata terribly stressful....which is how I ended up making two pinatas and Rachel became a party decoration and NOT a pinata.  

Finally the day of the party arrived!  As requested, we played Pin the Tail on the Muskox.  In my experience, Pin the Tail on the Whatever is wildly popular with the young ones.  Muskox tail pinning was no exception.  


I enjoy making the games a part of the party decoration.  As it turns out, I found painting blue muskoxen very satisfying.....so satisfying we add another game/party decoration....and another blue muskox....


This game we called "Wrangle the Muskox".  Basically a game of ring toss, we used hula hoops and a the muskox painting attached to a post.  We had three hula hoops going at once which made waiting for your turn much shorter, and the game more enjoyable.  


Rachel had her moment in the spotlight when we played, "Feed the Muskox".  I wrote a blog post a few years ago titled, "The Ultimate Birthday Party Game Guide".   Bean Bag toss is one of the tried and true favorites, and can fit almost any themed party.  Like the hula hoops in the ring toss, we had many bean bags making it unnecessary to wait long for a turn.  My son and his friends helped things run smoothly by tossing the bean bags back to the waiting crowd.  


We used the muskox masks in a game of chase.  I gave all the children muskox masks and one a wolf mask. Once you were tagged by the wolf you switched your muskox mask for a wolf mask and became a wolf until everyone was a wolf.  The kids played this game for a very long time and when it was finally over we were very ready for cake! 


OK, fair warning.....no mocking the cake.  If you are ever tasked with making a blue muskox cake with cream cheese frosting and you succeed in making an amazing cake, then you can mock my cake...but until then, only smiles and nods allowed.  It tasted good, and she loved it.  


Our last hoorah was the pinata.  As promised, Rachel was spared.  The pinata was filled with candy and small plastic animals.  


Blue Muskox turned out to be one of my favorite themed birthday parties to create.  Most importantly, our 7 year old had the, "BEST BIRTHDAY EVER!!!"


Friday, July 18, 2014

Capturing a Moment in Time....Our Pressed Flower Book


There are so many tender moments I would love to place in a bottle and save for later....  

I love to take walks with my camera, noticing all the flowers, insects, and other little wonders.  On our walks together, Mini Me likes to walk and take pictures, too.  It was her idea that we should make a flower book together.  She had a very elaborate plan.  However, in trying to be just like Mommy, she turned the extended lens of her camera....which doesn't work so well for a point and shoot.  She was devastated.  

Fast forward through the tears and wailing ...on to Plan B...Let Mommy take the pictures and you can pick and press the flowers, and we will put them together in a special book. Plan B was a brilliant success.  

Though we made our book in the late Winter and early Spring, this project would work well in the Summer and Fall, too!


You can use a flower press, but I chose to keep things simple and used a manageable sized book when were out on our walks. Carefully place the picked flower or leaf in the book so the petals will be well displayed later. Practice makes this task easier.  If the plant you are pressing is plentiful, press a few different samples. 

Once you are back home, you can transfer the pressed plants to a larger book.  I used a Physicians Desk Reference...which is huge. Phone books also work well.  I found that placing the plants on a sheet of paper and then placing them in the book makes it easier to remove the plants later. The sooner you place the plants in the larger book, the better.  When the plants are still fresh you can gently move the petals and leaves a bit so they are arranged how you would like them.  

Stack some more books on top of the one where the plants are being pressed, or place another heavy object on top to weight the book down.  Wait for a few days...we waited a week.


There are several ways to preserve and arrange plants after they are dried...the internet is full of ideas...this is how we made our flower book....

I cut squares of acid free paper.  I used Bristol board because it fairly thick, and I knew could handle the moisture in the following steps.  

We arranged the plants of our liking.  To hold them in place I used a small amount of acid free glue behind the larger parts of the plant.  

Next, we carefully painted on Acrylic Medium.  I think Mod Podge would have worked just as well, but I had Acrylic Medium handy.  We found it most successful to paint out from the center of the flower.  This took a little practice, and some trial and error.  

Finally, we set the plant and paper above the radiator to dry.  The Acrylic Medium only took a few hours to dry to the touch, but I let them sit over night for good measure.  


After the plants and papers were dry we placed them into a special photo album. We arranged the dried plants on one side and a photograph of the same plant on the other side.  I wrote the botanical name, common English name, and the common Italian name next to each plant.   

The book is our special treasure.  A store of fun times spent outdoors together, and fun times spent indoors working on projects together. 

Saturday, March 22, 2014

Herbivore vs. The Mask Maker

Bunny Mask
Rabbit Mask

Ahhh, the dilemmas of the mask maker. I've made several animal masks,  most recently, a Bear Mask and a Rabbit Mask, simultaneously.  The simultaneous making of the Bear and the Rabbit highlighted one of the challenges of mask making.  We have forward facing eyes.  Our forward facing eyes make masks of carnivores and omnivores less challenging than those of herbivores.  Herbivores have spent their time on the evolutionary food chain with their heads down munching grass.  Their eyes are on the sides of their heads so they can munch away and still be on the lookout for what may eat them.  Eyes on the sides of the head present a special challenge for the mask maker. When you put forward facing eyes on an animal that otherwise would have side facing eyes they go from a sweet little bunny to vicious bunny...dare I say "evil bunny"... if you aren't very careful. 

And now pictures of the Bear and the Rabbit.  You decide, vicious or cute? ....

Grizzly Bear Mask
Bear Mask


Easter Bunny

Grizzly Bear Mask

Easter Bunny

Grizzly Bear mask


Sunday, February 16, 2014

A New Quilt


The last project of 2013 was finishing my son's quilt. A few days into the New Year design work began on my daughter's quilt.  One day early January, as we were sitting in the chiropractor's office looking through an interior design magazine together, I realized she really likes bold geometric shapes.  I was happy for this realization, because it probably would not have been my first choice for her.  A few days later I worked up a preliminary drawing that she like, and she picked out fabrics.  Before I began cutting out squares the two of us sat down and looked at different quilt boards on Pintrest...just to make sure she really liked the design. She found a quilt with an eight pointed star and asked if we could add stars to the quilt.  Who am I to deny the child stars on her quilt? The original design had red squares, so with a wave of the magic wand we added points to the squares and voila!  We have stars.  I think the stars were a wonderful addition to the quilt, it seems like a nice blend of traditional and modern.  She loves it.

Last night I finally began the quilting.  I wanted to quilt it with concentric circles, she wanted it to be quilted with fun things, like her brother's quilt.  So we compromised, I am doing concentric circles of fun things.  I've been "collecting" different embroidery stitches.  It is slow going...I'll post more later, but the early report is favorable.


Saturday, January 4, 2014

Potato Print Snow People


So, my New Year's Resolution is to "finish unfinished projects," and I am careful not to say, "ALL unfinished projects," or "to not start new projects until the old projects are finished"...but, simply to finish unfinished projects. I wanted to finish these snow people before Christmas...last year. I found them today when I was looking for something else entirely. They seemed like a perfect candidate for realizing the resolution.

These are so fun and easy....

I began with black cotton velveteen rectangles. Why cotton velveteen? Well, I had just finished a holiday dress and it was handy.  Most any fabric would work, but I like the look of something with a nap and the black was a good contrast to the white of the snow people.

Next, cut some potatoes in half, I wish I had a picture, but really, this was a year ago, and I think you can handle a mental picture of a potato cut in half.  Then, dipped the cut side of said potato in white fabric paint mixed with a little glitter paint...the glitter is very important.  Press the potato paint side down on to the fabric to begin "building" snow people.  Doing a test run is highly recommended, you do need to apply a fair amount of pressure to the potato.  Making the potato print is great fun for all ages, definitely enlist the help of a wee one or two, if they are around.

After the snow people are dry...probably 24 hours or so...begin sewing features on to the snow people, to personalize them.  This part was a big hit with the younger crowd, sorting through and picking out beads and buttons, how could it not be fun? My lovely assistant did a smashing job.


I cut up some holey shirts to use for the hats and scarves (once upon a time, that red scarf was my favorite shirt).  The hems of the shirts make perfect hat bands. The red hat, on the shortest snow person, is from the sleeve an old sweater.


Here is how to tie the scarves...


First, with right sides together, sew two scarf halves on either side of the head.


After the scarf halves were sewn down, tie a simple knot.  To finish, tack the knot down.

At this point I let the project sit for about 13 months....it helps the paint cure...not really, but if it helps,
you can tell yourself that.

Finally, find the project buried in a pile of unfinished projects, and turn the neglected, but still adorable snow people in to incredibly handsome pillows.  And don't worry, snow people aren't just for Christmas...Winter has barely begun here in the Northern Hemisphere...Go forth and make snow people....


...make a whole snow family...


....or just one rogue snow dude in red boots...it's SNOW much fun!  

Wednesday, January 1, 2014

The Last Project of 2013

t-shirt quilt
I started a t-shirt quilt in April, as a sample for a class I was teaching.  It was suppose to be fast, fun, and finished a very long time ago. Those plans hit a snag right away...ironing the Pellon interfacing on the the backs of the t-shirt is neither fun, nor fast...but eventually I did finish.

Once the dread Pellon was on, I did have a lot of fun with the piecing. I added denim saved from holey jeans...denim being the natural complement to the t-shirt. I used the WHOLE t-shirt, not just the fronts...I even used the sleeves. My son has a certain affinity for the Italian flag, so I worked that into the piecing. Though the quilt looks fairly random, it is, for the most part, 18 inch squares.

The plan was to tie the quilt...BUT, as it turns out, I really don't like to tie.  I decided to do a mixture of different "ties." From the beginning the quilt included french knots, traditional ties, and "star" ties. However, even with the variety of ties, I quickly lost my steam and  the project sat for about 5 months.

In October I drug the quilt back out again, this time determined to finish.  I added a star, attached with a blanket stitch, and I decided to add my son's hand print, around which I chain-stitched...at this point I was about an eighth of the way done with the quilting, mostly in the bottom left hand corner, and still not very excited.

THEN, while cleaning out the garage, I found a large embroidery hoop I inherited from my grandmother! This was the game changer. I decided to add some hand quilting....and, as insane as it is, I really enjoyed the hand quilting.

I added more stars, more chain stitching, and more of all the ties. The more I did, the more I wanted to do and I fell in love with the project!

t-shirt quilt

Most of the work I did on the quilt was in the evening after the children were in bed.  One day my son made a suggestion that I add something of Star Wars to the quilt.  I decided to add the Death Star, but kept it a secret.  So the next morning when he woke up, I told him I added a moon to the quilt, just so I could hear him say, "that's no moon!"  He appreciated my humor.

death star

Even though tying is not my favorite, I could not resist adding ties around the mane of the lion.

tee shirt quilt

He is really excited about the pockets on the quilt...one will definitely be used for "Rudolf".

jeans quilt

I finished the binding on the quilt at about 11:55 last night...I really didn't want to have to change the date!
blue jeans quilt
Add caption

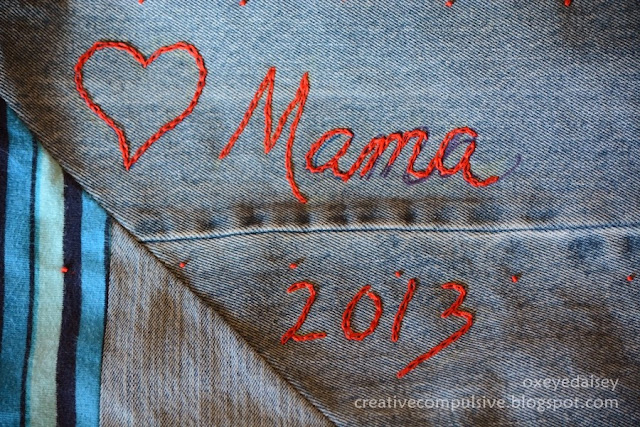
Not to worry, that's washable marker I used to write "Mama".  I haven't washed the quilt yet.  I can't wait to see it when it gets that kind of bumpy, lovely, "quilt" look to it after it has been washed.  One last picture of the back...just so you can see all that handy work....

hand quilting